
The easiest method to add recipients to your SimpleCert® account with a Google form is to use our Zapier integration. There is both a direct Google Forms integration available as well as a Google Sheets integration. If you do not wish to use the Zapier method, there is a direct integration you can do within Google Forms/Sheets. This method does require a minor amount of programming knowledge to accomplish, so only proceed with this option if you are comfortable with accessing code.
We will do this by setting up a Google Form and linking it to a Google Sheet that will store the submissions. Inside that Google Sheet we will need to add some code that sends new entries to SimpleCert® through our API. The API is simply a way to send data to our system from external sources using a specific API Key that is generated for your account.
Getting an API Key
You can generate an API Key within our API testing tool by entering your username and password here https://app.simplecert.net/api-docs#!/User/getApiKey. The Key will be returned in the response body below the “Try It Out” button.
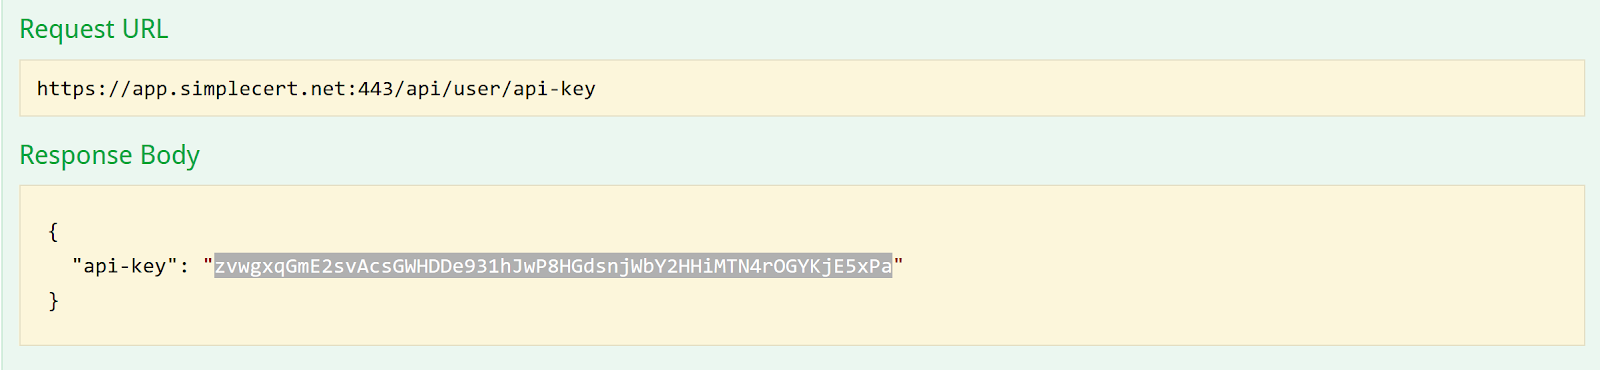
Copy that key (just the string of letters and numbers highlighted above) and save it in a notepad for later. Every time you run this tool it will overwrite your previous keys, so getting a new key will make all of your old keys invalid.
Setting Up Your Google Form
Your Google form needs to have all of the fields associated with a specific project’s certificate, so it is important to review your certificate and most likely create a new project before continuing. When a project is first created it makes a copy of the certificate template and all of its required fields. If you add new fields to your certificate after a project has been created, that project will not have those new fields in it.
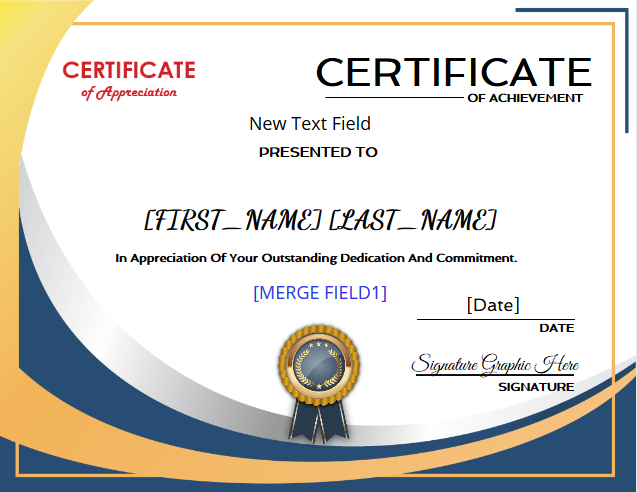
Copy Your Certificate Fields
In order to send the correct data from our integration we will want to go to the certificate builder and look at the certificate we are going to be using on our project. In the editor you should see all of the fields that will be used to create it. Write those fields down exactly as they are entered between the “[ ]” brackets. The following certificate would have “FIRST_NAME”, “LAST_NAME”, “Date”, and “MERGE FIELD1”. Make sure you copy these down exactly as they are all required and must match precisely. There will also be an “EMAIL_ADDRESS” field but that will be present on all projects.
Create a New Project
Creating a new project is the safest way to know what fields are required. The easiest way to do this and to get the list of required fields is to go to the “Send” section of the app, select your desired certificate template and manually import one recipient. This will let you test that all of the fields are up to date and there isn’t anything unknown or missing in your project certificate. Click Add to Recipient List and then “Save Project” on the following screen. That will bring a popup that lets you set the Project ID Name. When you hit submit it will take you to a page where you can send your certificates, but it will also add the actual Project ID number to the urls in the following format: app.simplecert.net/send/123456/send. Copy the bolded 6-7 digit number and add it to your notes.
Creating Your Form
Now we have all of our data, it’s time to create the actual form. Go to Google Forms and create a new blank form. Add all of the fields you need and match them with your certificate’s fields. For any date field it is easier to use a “short answer” field instead of a date field due to how Google Sheets formats dates. Once all of your fields are ready, click on the “Responses” tab and then on the Google Sheets icon to “Create Spreadsheet”.
You should now have a spreadsheet with all of your questions in individual columns along with a timestamp column.
Enter in The Custom Script.
To enter the script you simply need to go to “Tools” > “Script Editor”, and then replace the sample code displayed there with the following:
/**
 * Enter your accounts API-Key.
 * A new api key can be generated here https://app.simplecert.net/api-docs#!/User
 */
var api_key =  "IS63MQQquPggfJNMkXx01zK695dsdyieJla8utamSw1y8gghisjgH82hS9qeru";

/**
 * Enter your Project ID Number (Not the Project ID, but the 4-6 digit ID Number)
 * To find this you can go to https://app.simplecert.net/store/ and select the project you want the id for.
 * The ID Number will be at the end of the url like https://app.simplecert.net/store/projects/12345
 */
var project_id = "12345";

/**
 * Enter the individual fields and their corresponding column in the Google Forms Spreadsheet.
 * The following fields will be in most all of the integrations and the field names must match exactly what is here:
 *   "FIRST_NAME"
 *   "LAST_NAME" (Or "FIRST_NAME LAST_NAME" if you are using the single data field option for names)
 *   "EMAIL_ADDRESS"
 *   "PROGRAM_TITLE"
 *   "DATE"
 */
var spreadsheet_rows = {
    "FIRST_NAME": 2,
    "LAST_NAME": 3,
    "EMAIL_ADDRESS": 4,
    "PROGRAM_TITLE":  5,
    "DATE": 6,
};


//Do not edit below this point
function Initialize() {
  try {
    var triggers = ScriptApp.getProjectTriggers();

    for (var i in triggers)
      ScriptApp.deleteTrigger(triggers[i]);

    ScriptApp.newTrigger("SubmitGoogleFormData")
      .forSpreadsheet(SpreadsheetApp.getActiveSpreadsheet())
      .onFormSubmit().create();

  } catch (error) {
    throw new Error("Please add this code in the Google Spreadsheet");
  }
}

function SubmitGoogleFormData(e) {

  if (!e) {
    throw new Error("Please go the Run menu and choose Initialize");
  }

  try {
    var ss = SpreadsheetApp.getActiveSheet();
    var lr = ss.getLastRow();

    var payload = {};

    for (var k in spreadsheet_rows){
      if (typeof spreadsheet_rows[k] !== 'function') {
      	payload[k] = ss.getRange(lr, spreadsheet_rows[k], 1, 1).getValue();
      }
    }

    // set up authorisation
    var headers = {
      "api-key" : api_key
    };
    //build up options
    var options = {
      'method': 'post',
      "contentType" : "application/json",
      'headers': headers,
      'payload': JSON.stringify(payload),
      'muteHttpExceptions': false
    }
		// set API method URL  - requestbin
    var url = "https://app.simplecert.net/api/projects/" + project_id + "/recipient/add";
		// make the call
    var response = UrlFetchApp.fetch(url, options);
		// log the response (useful for debugging )
    Logger.log(JSON.stringify(response));

  } catch (error) {
    Logger.log(error.toString());
  }
}

Within that code we need to replace the api_key and project_id variable with the ones you got earlier. Then we need to update the code starting on line 23 to match your spreadsheet columns and add any merge fields. Copy and paste the field names to match yours by adding a new line for any missing fields. The number after them is the column number in the spreadsheet. So the “FIRST_NAME” is in the 2nd column according to the provided code.
When you are done you go to “File” > “Save” and enter a project name. Then make sure the selector in the tool bar is set to “Initialize” ![]() then click the “Run” button (the triangle “play button” as seen in the previous image).
then click the “Run” button (the triangle “play button” as seen in the previous image).
Depending on your current accounts permissions it may give you an “Authorization required” popup. If that happens, click review permissions and then select your google account and continue through until you click “Allow.”
Test your Form
Test your form by going to your form editor and clicking the preview button in the top right of the screen (eye icon).

Fill out the form and check in your account to make sure the new recipient was added correctly.